
Fetching elements is an everyday task when using Selenium for test automation. Selenium supports different methods for finding elements, but xPath takes the spotlight, because it offers basic and advanced tactics to retrieve elements, and it’s remarkably versatile.
As you probably know, Selenium supports several programming languages, and Python is in the mix. In this post, we bring you a guide on how to use XPath in Selenium with Python to locate elements quickly and efficiently.

What Is XPath and how is it used in Selenium with Python?
What is XPath in the first place, and why should you care about it? XPath stands for XML Path Language, and it’s a syntax you can use to navigate through elements on the DOM (Document Object Model.) To be more technically correct, XPath can target nodes from any XML document, so it’s not restricted to HTML. But it’s heavily used in web test automation as a flexible way to locate elements from a page.
Ready for a quick taste of XPath? Let’s do it:
- First, open Tricentis’ blog on Chrome.
- Then, open the developer tools aka Chrome DevTools (F12 or Control + Shift + I on Windows/Linux, or Command + Option + I on the Mac).
- Go to the Console tab.
Input the following command, then press Enter:
$x(“.//nav”)
You should see a result like the one in the following image:
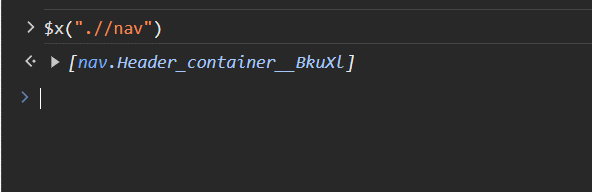
What just happened? First, understand that the $x part is a developer tools thing. It’s shorthand in the developer tools console, acting similarly to a function. It represents document.evaluate(), allowing you to execute XPath queries directly in the console. The actual XPath query is just the part between quotes (the .//nav part).
The query you used represents a relative search for any <nav> elements. In our case, there’s only one such element, so that’s what was retrieved. If there were several <nav> elements, all of them would be returned.
XPath in Selenium with Python: A hands-on guide
Now that you know about the fundamentals of XPath, let’s see how to kick off the XPath/Selenium/Python trio in real-life scenarios. But first, let’s review some key prerequisites.
Prerequisites
To follow along with the tutorial, you need:
- Some experience with Python and Selenium
- A recent version of Python installed on your system
- A proper setup able to drive a Google Chrome browser using the Selenium bindings for Python
- Last but not least, a simple Python project, with the Selenium bindings installed
Testing your setup
Let’s start with a quick smoke test to ensure your setup works. Open your project and add the following contents to the main file:
from selenium import webdriver
browser = webdriver.Chrome()
browser.get(‘https://selenium.dev/’)
Assuming your file is named main.py, run it:
python main.py
If a Chrome window opens, goes to the Selenium website, and then closes, your setup works like a charm. You’re ready to move forward.
How can I find a specific element by XPath using Selenium Python?
You’ll now learn how to get a specific element using XPath. For the next tests, we’re going to continue using the Selenium website. So, let’s pick an element to retrieve:
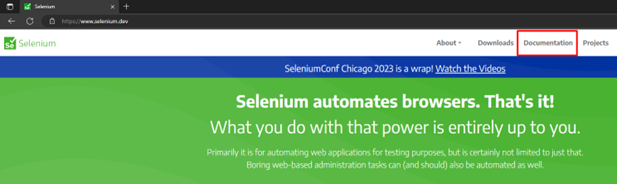
The image above shows the homepage and highlights the Documentation navigation menu, which is the third navigation item. That’s the element you’re going to locate using XPath.
The first step would be to understand the hierarchy of the page’s DOM, so you can get a sense of how to reach the desired element. To do this, you can right-click the Documentation item, and then click on Inspect Element. Then, you’ll see that the hierarchy of nodes looks like this:
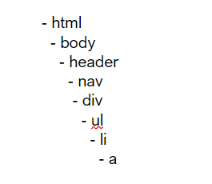
There are 8 <li> elements. The one we’re after is the fourth one, which contains an <a> element —a link—that points to the documentation page. Based on that, it’s not hard to write a query to get the element.
Let’s first use a relative path—i.e., a query that starts from the root element. Such a query would look like this:
“./html/body/header/nav/div/ul/li[4]/a”
Let’s break that down. The ./ at the beginning indicates we’re dealing with an absolute path. Then, we go through all the elements, from the root until the desired <a> node. Notice we used an index to access the fourth list item and then the link inside of it. Notice that the index is one-based instead of zero-based.
Let’s now use Python and Selenium to turn the query above into something that can run.
First, add the following import:
from selenium.webdriver.common.by import By
Then, add the following two lines to the bottom of your file:
target_element = browser.find_element(By.XPATH,
“./html/body/header/nav/div/ul/li[4]/a”)
print(target_element.text)
The first line uses the find_element method to find the node we want, providing two arguments:
- the first indicates the method is to search the element using XPath—there are several other methods available
- the second argument, as you can see, is the path itself
Finally, we have a simple print statement. If everything is correct, upon running the code above, you’ll see “Documentation” displayed on the console.
Finding a specific element using relative path
The previous example used an absolute path to retrieve the element, which is often not the best option. If the page suffers any changes that cause the path you used to become invalid, your automation will stop working.
A possible solution is employing relative paths. As the name suggests, a relative path is one that you write relative to a given element. Relative paths are intrinsically more resilient to changes to the page structure.
To convert out the previous XPath so it uses a relative path, simply replace the second argument to the find_element method with the following:
“//nav/div/ul/li[4]/a”
There are two differences here:
- our query now begins with two slashes (//)
- the path now starts from the nav element, instead of the root
There’s only one <nav> element on the page, so that’s what will be used as the root of the expression. Then, the query will keep navigating through the other nodes. If anything from up the tree changes, it won’t affect our query, as long as nothing changes with the hierarchy that starts at the <nav> element.
Selenium XPath functions
Let’s cover one slightly more advanced topic in XPath: working with functions. When writing your XPath query there are several handy functions you can leverage to make your life easier. These include: contains(), starts-with, and ends-with().
Time for examples. Add the following two lines to your code, then run the file:
paragraph = browser.find_element(By.XPATH, “//p[contains(text(), ‘power’)]”)
print(paragraph.text)
If you did everything right, the following line will appear:
What you do with that power is entirely up to you.
So, what happened here? We used the contains() function, providing it with two arguments:
- the text() attribute, which returns the text from the element searched, and
- the string we’re trying to find
In plain English, we’re saying to Selenium: please give me all <p> elements where text contains the word “power.” Since we’re using the find_element method, only the first match is returned. If we had used the find_elements variation, we would have gotten a list with all matches.
Now, let’s change the example so it uses the starts_with() function:
paragraph = browser.find_element(By.XPATH, “//p[starts-with(text(), ‘What’)]”)
The rationale here is the same:
- we use the text() attribute to retrieve the text from elements
- the starts-with() function returns true if the text starts with the substring passed—in this case, “What”
The result will be the same, but in this case, we used a different function.
Selenium, XPath, and Python: Ingredients for the perfect test automation recipe!
Test robustness is a big challenge when writing test automation code. The last thing you want is for your tests to be fragile and break with every minor change to the application under test.
This is an even tougher task when it comes to testing the front end of web applications. UIs are intrinsically volatile: they tend to change a lot. That’s why when working with front-end testing it’s vital to come up with a strategy for locating elements that are resilient in the face of change.
XPath is a tool that can help you with such a task. By writing well-thought-out XPath queries, you can locate elements in ways that make your tests robust, reducing the burden of test maintenance. In this post, you’ve seen how to use the Selenium/Python dynamic duo to write simple and efficient XPath queries.
This post was written by Carlos Schults. Carlos is a skilled software engineer and an accomplished technical writer for various clients. His passion is to get to the bottom (the original source) of things and captivate readers with approachable and informative technical content.