What is React Navigation?
React Navigation is a React Native library for routing and navigation. It is a popular choice for most React Native developers because of how easy it is to integrate into React Native applications. Tricentis Testim Mobile ensures that your React Native applications are thoroughly tested. Tricentis Testim Mobile is an advanced AI-powered test automation platform designed to simplify and accelerate mobile application testing. It helps development teams streamline testing workflows, improve software quality, and deliver robust mobile applications faster.
The current version, React Navigation v5, saw a complete rewrite of v4 and came with some highlights such as:
- Hooks: Hooks introduced in React v16.8 allow you to use state and other React features in functional components. React Navigation v5 introduced custom hooks for common use cases.
- New Theming API: The API was revamped with features like dark mode and built-in component customization.
- Component-Based Configuration: Instead of statically configuring the navigator, configurations are now dynamic inside built-in components.
- Redux DevTools Integration: React Native Navigation now integrates with Redux DevTools, enabling debugging navigation actions directly from the browser console.
Prerequisites
To follow along with this tutorial, you should have:• Knowledge of JavaScript and React
- Knowledge of JavaScript and React
- Knowledge of React Native
- Node v12 or greater
- npm and/or yarn
- An emulator to test the application
Setting up a React Native project
Before installing React Navigation, we need an existing React Native project. We can create one with Expo, a framework for building and testing React Native applications quickly.
npm install -g expo-cli
expo init my-react-native-app
cd my-react-native-app
expo start
Now that we have a React Native project running, we can move on to creating screens and setting up navigation.
We now have a react native project to run it, on your terminal run expo start and choose your emulator of choice. Alternatively, you can write and run your code with Snack which is an expo online editor.
Creating screens
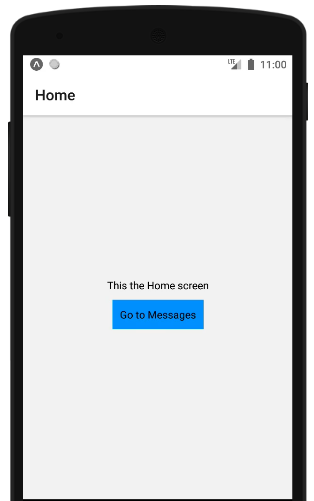
To demonstrate different navigators, we will create four screens: Home.js, Messages.js, Profile.js, and Cart.js.
Home.js
import React from 'react';
   import { View, Text, Pressable, StyleSheet } from 'react-native';
   const Home = () => {
     return (
<View style={styles.container}>
<Text>This the Home screen</Text>
<Pressable
           style={styles.button}
           onPress={}>
<Text>Go to Messages</Text>
</Pressable>
</View>
     );
   };
   const styles = StyleSheet.create({
     container: {
       flex: 1,
       alignItems: 'center',
       justifyContent: 'center',
     },
     button: {
       backgroundColor: '#09f',
       alignItems: 'center',
       padding: 10,
       marginVertical: 10,
     },
   });
   export default Home;
Messages.js`
import React from 'react';
   import { View, Text, StyleSheet } from 'react-native';
   const Messages = () => {
     return (
<View style={styles.container}>
<Text>This is a message screen</Text>
</View>
     );
   };
   const styles = StyleSheet.create({
     container: {
       flex: 1,
       alignItems: 'center',
       justifyContent: 'center',
     },
   });
   export default Messages;
Profile.js
import React from 'react';
import { View, Text, StyleSheet } from 'react-native';
const Profile = () => {
 return (
<View style={styles.container}>
<Text>This is a Profile Screen</Text>
</View>
 );
};
const styles = StyleSheet.create({
 container: {
   flex: 1,
   alignItems: 'center',
   justifyContent: 'center',
 },
});
export default Profile;
Cart.js
import React from 'react';
import { View, Text, StyleSheet } from 'react-native';
const Cart = () => {
 return (
<View style={styles.container}>
<Text>This is a Cart Screen</Text>
</View>
 );
};
const styles = StyleSheet.create({
 container: {
   flex: 1,
   alignItems: 'center',
   justifyContent: 'center',
 },
});
export default Cart;
We now have the necessary screens we will need for building a navigation structure. Let us move forward.
Installing React Navigation
Now that we have a react native application, we can go ahead to install the react-navigation.
Navigate to the project directory,
cd project-nameand run the code below to install the react navigation library.
npm install @react-navigation/native

## if you're using yarn
yarn add @react-navigation/native
React navigation has some dependencies which are core utilities used by navigators when creating the navigation structure of your application. Run the code below to install those dependencies
expo install react-native-gesture-handler react-native-reanimated react-native-screens react-native-safe-area-context
@react-native-community/masked-view
The code above will install the recommended versions of the dependencies for expo-managed projects. To install in a react native project not managed by expo run the code below
# npm
npm install react-native-reanimated react-native-gesture-handler react-native-screens react-native-safe-area-context
@react-native-community/masked-view

# yarn
yarn add react-native-reanimated react-native-gesture-handler react-native-screens react-native-safe-area-context @react
-native-community/masked-view
Types of navigators in React Navigation
Navigators help in defining the structure of the navigation of an app. Before we combine navigators, lets walk-through the various navigators react-navigation offers.
Stack navigator
The stack navigator is a navigator that has a behavior similar to that of a web browser history stack. When a user moves forward to another screen, the screen is added to a stack, and when they go backward the current screen is popped off from the stack. The major difference between a web browser history stack and the Stack Navigator of React Navigation is the added gestures and animations which give a more native-like experience to the users.
To get started with the React Navigation stack navigator, navigate to the project root and run the code below to install the stack navigator:
#npm
npm install @react-navigation/stack

#or yarn
yarn add @react-navigation/stack
This installs the react-navigation stack navigator library. Each react-navigation navigator comes with its library which is dependent on the set of libraries we installed earlier.
Create a folder called navigation in the root directory this is where our navigators will live. Navigate to the navigation directory and create a file called StackNavigator.js. Open the file and paste the code below
import React from 'react';
import { createStackNavigator } from '@react-navigation/stack';
import Home from '../screens/Home';
import Messages from '../screens/Messages';
import Profile from '../screens/Profile';
import Cart from '../screens/Cart';
const Stack = createStackNavigator();
const StackNavigator = () => {
 return (
<Stack.Navigator>
<Stack.Screen name="Home" component={Home} />
<Stack.Screen name="Messages" component={Messages} />
<Stack.Screen name="Profile" component={Profile} />
<Stack.Screen name="Cart" component={Cart} />
</Stack.Navigator>
 );
};
export default StackNavigator;
The createStackNavigator is a function that returns a Navigator and Screen component used in configuring a stack navigator. The Navigator is a container component that takes the Screen components as children and shouldn’t be embedded in a Screen component.
The name props passed to Stack.Screen is the route of the component to be rendered, so when a user navigates to “Messages” the Messages component is rendered.
Open the App.js file and replace the boilerplate code with the code below:
import React from 'react';
import { NavigationContainer } from '@react-navigation/native';
import StackNavigator from './navigation/StackNavigator';
export default function App() {
 return (
<NavigationContainer>
<StackNavigator />
</NavigationContainer>
 );
}
The first change here is the NavigationContainer which has been imported from the React Navigation library. The NavigationContainer is a component that is responsible for managing the navigation state and navigation tree. It is a top-level component responsible for wrapping the navigators so it is advised to render the NavigationContainer at the root of the application.
At this point, you can save and view the application in your emulator. It initially renders the Home component of our Navigator. We can override this behavior by passing an initialRouteName as props to the Navigator component in the StackNavigator.jsfile.
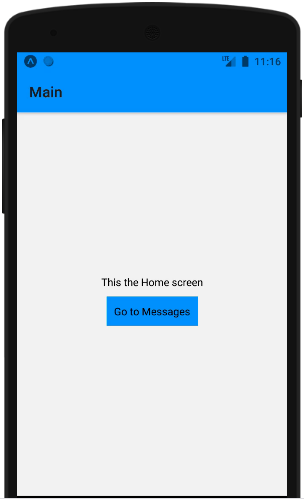
Additionally, we can modify and style the header of a screen by passing an options prop to the Screen component in the StackNavigator.js file. Open the file and refactor the Home screen:
// Old code
<MainStack.Screen name="Home" component={Home} />

// New code
<MainStack.Screen
 name="Home"
 component={Home}
 options={{
   title: 'Main',
   headerStyle: {
     backgroundColor: '#09f',
   },
 }}
/>
We’ve renamed the title of the Home component to Main and changed the background color of the header.
To navigate between screens we will make use of a navigation prop that is passed down to screens. Go to the Home.js component and refactor it to look like the code below:
import React from 'react';
import { View, Text, Pressable, StyleSheet } from 'react-native';
const Home = ({ navigation }) => {
 return (
<View style={styles.container}>
<Text>This the Home screen</Text>
<Pressable
       style={styles.button}
       onPress={() => navigation.navigate('Messages')}>
<Text>Go to Messages</Text>
</Pressable>
</View>
 );
};
const styles = StyleSheet.create({
 container: {
   flex: 1,
   alignItems: 'center',
   justifyContent: 'center',
 },
 button: {
   backgroundColor: '#09f',
   alignItems: 'center',
   padding: 10,
   marginVertical: 10,
 },
});
export default Home;
As earlier mentioned the navigation prop is a prop that is passed to the screens. It contains functions used for navigation actions. The function we are interested in is the navigate function. It enables a user to move between screens and accepts the name of the route as parameter navigation.navigate(‘Messages’).
Now if you go back to the app and click on the “Go to Messages” button it will render the Messages component:
Tab navigator
This perhaps is the most common navigator in mobile applications. It is usually placed at the bottom of the screen but can also be placed at the top.
To get started, navigate to your root directory and paste the code below to install the Tab Navigator.
# use npm
npm install @react-navigation/bottom-tabs

# use yarn
yarn add @react-navigation/bottom-tabs
Create a file TabsNavigator.js in the navigation directory and paste the code below:
import React from 'react';
import { createBottomTabNavigator } from '@react-navigation/bottom-tabs';
import Home from '../screens/Home';
import Messages from '../screens/Messages';
import Profile from '../screens/Profile';
import Cart from '../screens/Cart';
const Tabs = createBottomTabNavigator();
const TabsNavigator = () => {
 return (
<Tabs.Navigator>
<Tabs.Screen name="Home" component={Home} />
<Tabs.Screen name="Messages" component={Messages} />
<Tabs.Screen name="Profile" component={Profile} />
</Tabs.Navigator>
 );
};
export default TabsNavigator;
Go to App.js and modify the code to include the TabsNavigator:
import React from 'react';
import { NavigationContainer } from '@react-navigation/native';
import TabsNavigator from './navigation/TabsNavigator';
export default function App() {
 return (
<NavigationContainer>
<TabsNavigator />
</NavigationContainer>
 );
}
Save and run the app in your emulator, you should be presented to a screen similar to the screenshot below:
From the screenshot, you can notice the tabs at the bottom of the screen. And unlike a stack Navigator where we had to call the navigation.navigate() function to move between screens, you can move between screens in a Tab Navigator by clicking on the tabs.
Drawer navigator
A drawer navigator is a navigator that can be opened by gestures. It is usually hidden, and when an action is performed such as clicking a button or a gesture, it launches the navigation from the side of the screen.
To install the navigator, run the code below in the root of your project:
# use npm
npm install @react-navigation/drawer

# use yarn
yarn add @react-navigation/drawer
After installation, create a file in the navigation directory called DrawerNavigator.js and paste the code below:
import React from 'react';
import { createDrawerNavigator } from '@react-navigation/drawer';
import Home from '../screens/Home';
import Cart from '../screens/Cart';
const Drawer = createDrawerNavigator();
const DrawerNavigator = () => {
 return (
<Drawer.Navigator>
<Drawer.Screen name="Home" component={Home} />
<Drawer.Screen name="Cart" component={Cart} />
</Drawer.Navigator>
 );
};
export default DrawerNavigator;
Similar to the previous navigators we’ve created, the @react-navigation/drawer returns a Navigator and Screen component used in designing the navigation structure.
Open the App.js and refactor it to include the DrawerNavigator we’ve created:
import React from 'react';
import { NavigationContainer } from '@react-navigation/native';
import DrawerNavigator from './navigation/DrawerNavigator';
export default function App() {
 return (
<NavigationContainer>
<DrawerNavigator />
</NavigationContainer>
 );
}
Save and run the app in an emulator, it renders the Home component. To open the drawer, you can use a gesture by swiping from left to right like the screenshot below:
Alternatively, we can add a button to the Home screen to toggle the Drawer Navigation. Open the Home.js file and refactor to the code below:
import React from 'react';
import { View, Text, Pressable, StyleSheet } from 'react-native';
const Home = ({ navigation }) => {
 return (
<View style={styles.container}>
<Text>This the Home screen</Text>
<Pressable
       style={styles.button}
       onPress={() => navigation.navigate('Messages')}>
<Text>Go to Messages</Text>
</Pressable>
<Pressable
       style={styles.button}
       onPress={() => navigation.toggleDrawer()}>
<Text>Toogle Side Nav</Text>
</Pressable>
</View>
 );
};
const styles = StyleSheet.create({
 container: {
   flex: 1,
   alignItems: 'center',
   justifyContent: 'center',
 },
 button: {
   backgroundColor: '#09f',
   alignItems: 'center',
   padding: 10,
   marginVertical: 10,
 },
});
export default Home;
When a user clicks the “Toggle Side Nav” button it runs the toggleDrawer function which is exposed by the navigation props. The toggleDrawer function opens or closes the Drawer navigation depending on the status of the navigator.
Bringing it all together
We’ve seen the different types of navigators in most applications using a single type of navigator is enough, but some applications combine different navigators. Combining navigators works by nesting one navigator in the screen of another navigator, for example putting a stack navigator into a screen in a drawer navigator.
For our use case, we will nest the Drawer Navigator in the Stack Navigator, and nest the Stack Navigator in our Tabs Navigator making the Tabs Navigator our primary Navigator.
Open the StackNavigator.js file and refactor the code to the code below:
import React from 'react';
import { createStackNavigator } from '@react-navigation/stack';
import DrawerNavigator from './DrawerNavigator'
import Messages from '../screens/Messages';
import Profile from '../screens/Profile';
const Stack = createStackNavigator();
const StackNavigator = () => {
 return (
<Stack.Navigator>
<Stack.Screen
       name="Home"
       component={DrawerNavigator}
       options={{
         title: 'Main',
         headerStyle: {
           backgroundColor: '#09f',
         },
       }}
     />
<Stack.Screen name="Messages" component={Messages} />
<Stack.Screen name="Profile" component={Profile} />
</Stack.Navigator>
 );
};
export default StackNavigator;
From the modified code above, we’ve nested the DrawerNavigator in the Home screen component. The next step is nesting the Stack Navigator in the Tabs Navigator.
Open the TabsNavigator.jsfile and replace the existing code with the code below:
import React from 'react';
import { createBottomTabNavigator } from '@react-navigation/bottom-tabs';
import StackNavigator from './StackNavigator'
import Home from '../screens/Home';
import Messages from '../screens/Messages';
import Profile from '../screens/Profile';
const Tabs = createBottomTabNavigator();
const TabsNavigator = () => {
 return (
<Tabs.Navigator>
<Tabs.Screen name="Home" component={StackNavigator} />
<Tabs.Screen name="Messages" component={Messages} />
<Tabs.Screen name="Profile" component={Profile} />
</Tabs.Navigator>
 );
};
export default TabsNavigator;
Similar to the StackNavigator.js , we’ve embedded the StackNavigator in the Home screen component of the TabsNavigator. What’s left is making sure the TabsNavigator component is rendered in the App.js file.
Open the App.js file and render the TabsNavigator component:
import React from 'react';
import { NavigationContainer } from '@react-navigation/native';
import TabsNavigator from './navigation/TabsNavigator';
export default function App() {
 return (
<NavigationContainer>
<TabsNavigator />
</NavigationContainer>
 );
}
Save and view the application in an emulator.
Conclusion
We’ve explored how to set up navigation using Stack, Drawer, and Tab Navigators and how they can be combined effectively.
We’ve seen how to build a navigation structure by combining a Stack, Drawer, and Tabs Navigator. Something to note when nesting navigators is to keep it as minimal as possible to avoid performance issues and a confusing user experience.
You can view and test the code to the complete project here. You can also learn more about how Testim helps with testing your React Native apps here.
Why Use Tricentis Testim Mobile?
Tricentis Testim Mobile ensures that your React Native applications are thoroughly tested with automated, AI-driven mobile testing. Key features include:
• Codeless automation: Create automated tests with minimal coding knowledge.
• AI-powered test stability: Reduce flaky tests and improve accuracy.
• Parallel execution: Run multiple test cases simultaneously for faster results.
• CI/CD integration: Seamlessly integrate with existing DevOps pipelines.
Start automating your React Native app testing today with Tricentis Testim Mobile!