
AI Approaches Compared: Rule-Based Testing vs. Learning
How can AI be put into practice? Learn about AI in software testing....
Discover to format Swift strings and how Testim Mobile can streamline your iOS testing with automated solutions. Perfect for developers seeking efficiency.
Strings are basically collections of characters. And they’re like what we have in other languages in Swift. In this post, we’ll learn to run our Swift code in the Xcode playground.
String formatting is a fundamental aspect of coding in Swift, especially for those developing mobile apps. In this guide, we’ll explore the essentials of Swift string formatting and how it can be seamlessly integrated into your iOS development workflow. Additionally, we’ll introduce you to Tricentis Testim Mobile—a powerful no-code testing platform designed to automate your mobile testing processes, saving you time and ensuring your app performs flawlessly.
After that, we’ll learn about the basics of strings. Then we’re going to investigate various examples of how to format Swift strings.
We’ll run our swift code in the macOS code editor called Xcode
We’ll run our Swift code in the macOS code editor called Xcode. Since Swift is used for iOS development, the reader is expected to have a Mac machine. We also need to have Xcode installed on our Mac through the App Store.
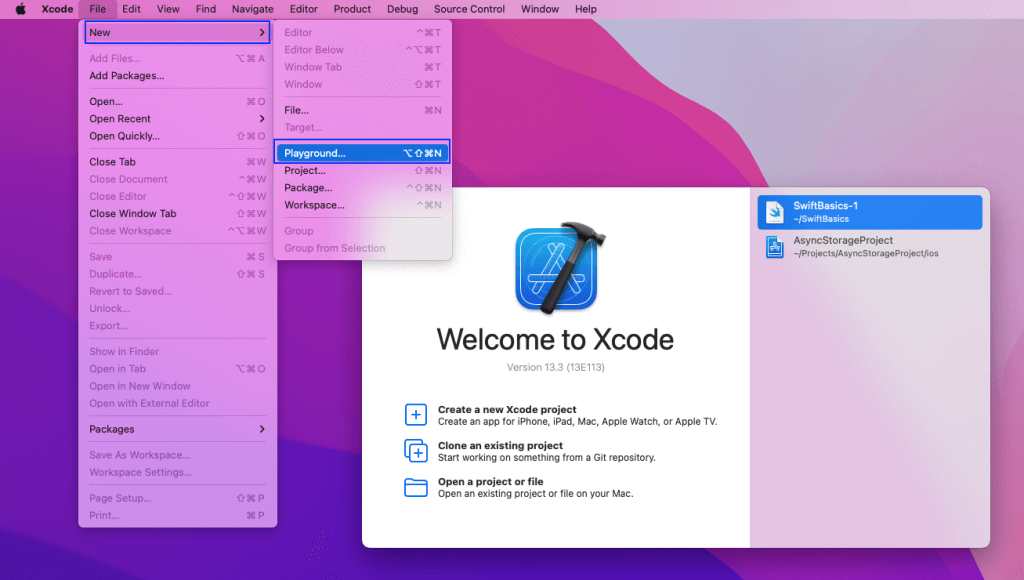
First, open Xcode and then click on File -> Playground.
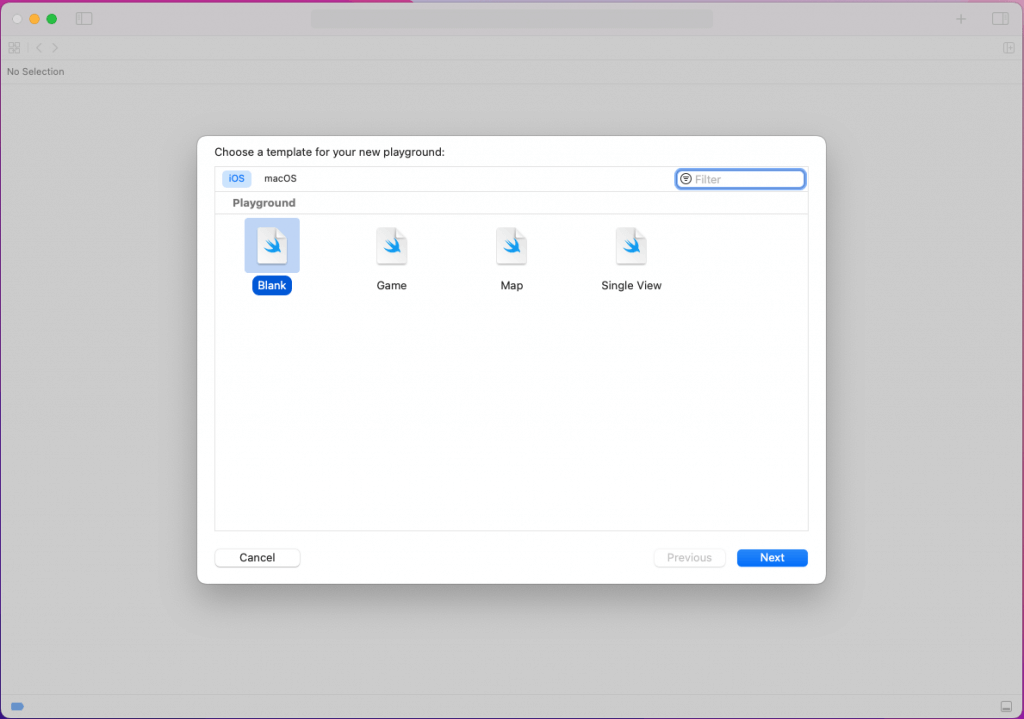
On the next screen, select iOS and Blank. And then press the Next button.
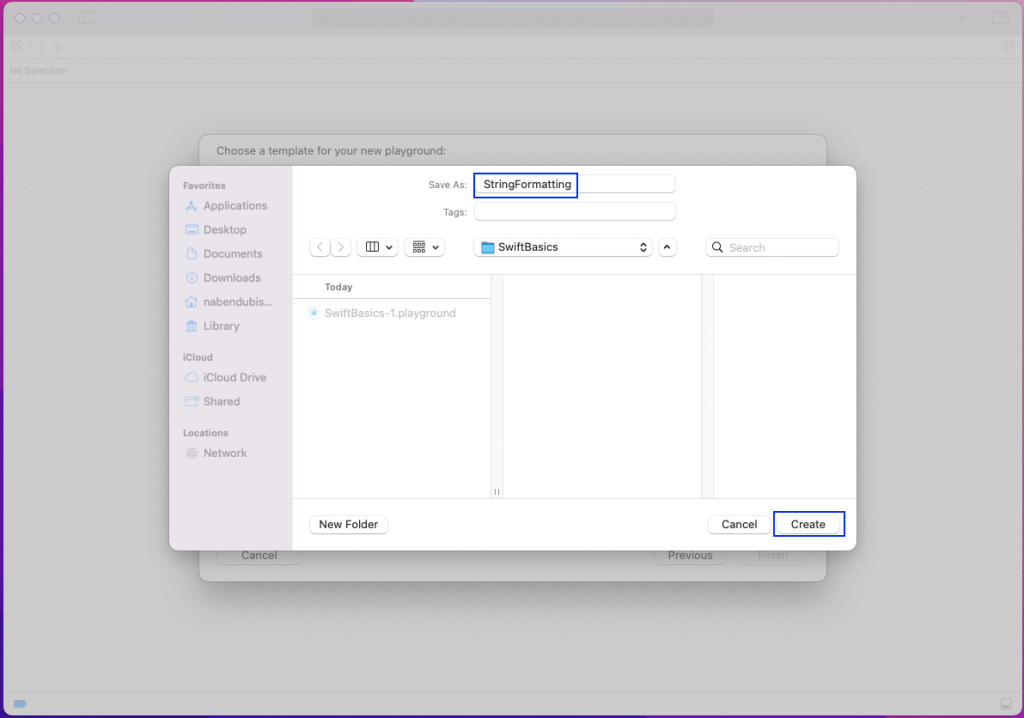
Now we need to give the playground a name. So we’ll give it the name StringFormatting. After that, click on the Create button.
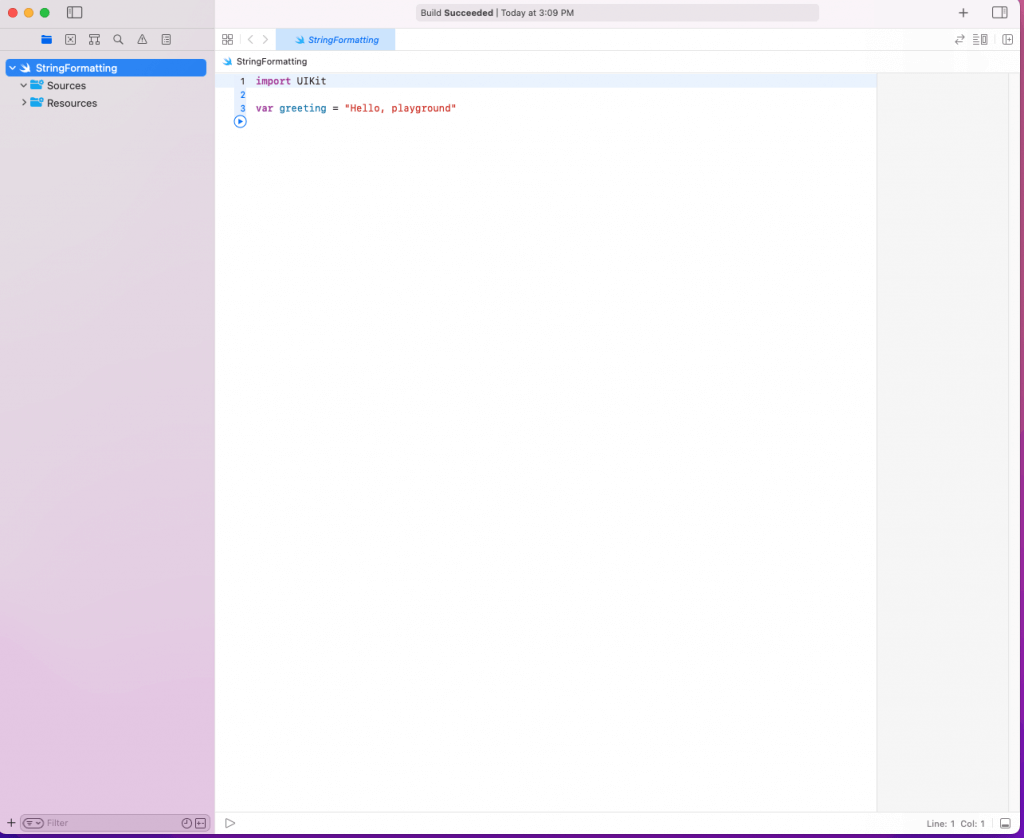
Finally, we’ll get the playground in which we’ll write the code to format the string.
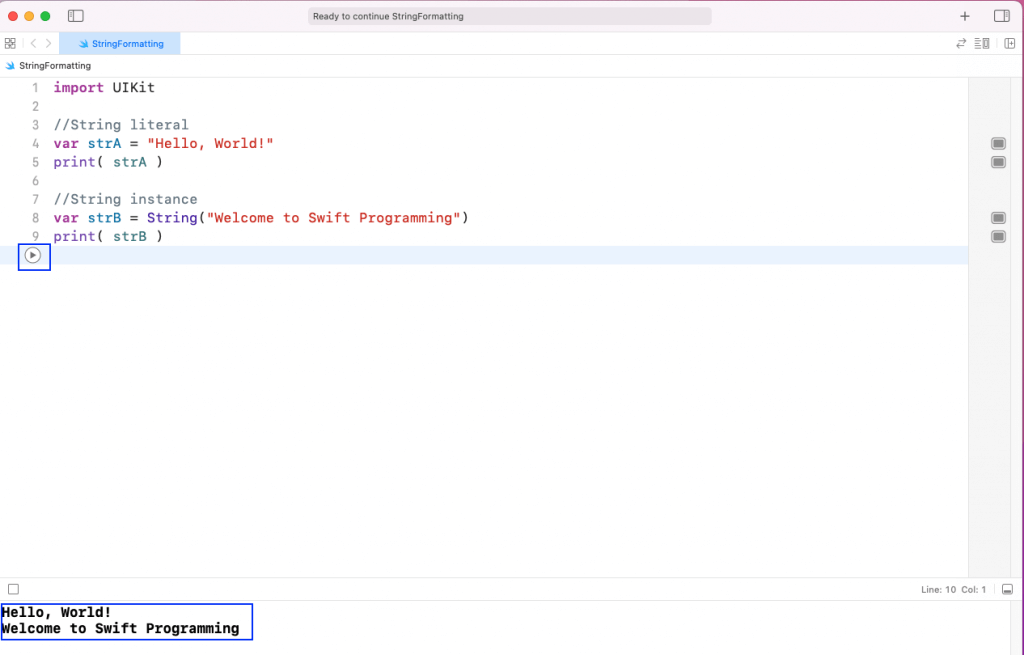
We create a string in Swift using a String literal or String class instance. In the playground, we’ll create two strings using literal and instance and print them.
Notice that in the first, we’re just giving the string inside double quotes. And in the second, we’re giving it inside the String() class. Add the below code in the playground:
//String literal
var strA = "Hello, World!"
print( strA )
//String instance
var strB = String("Welcome to Swift Programming")
print( strB )To run the program and see the result in the console, we need to click on the run button.
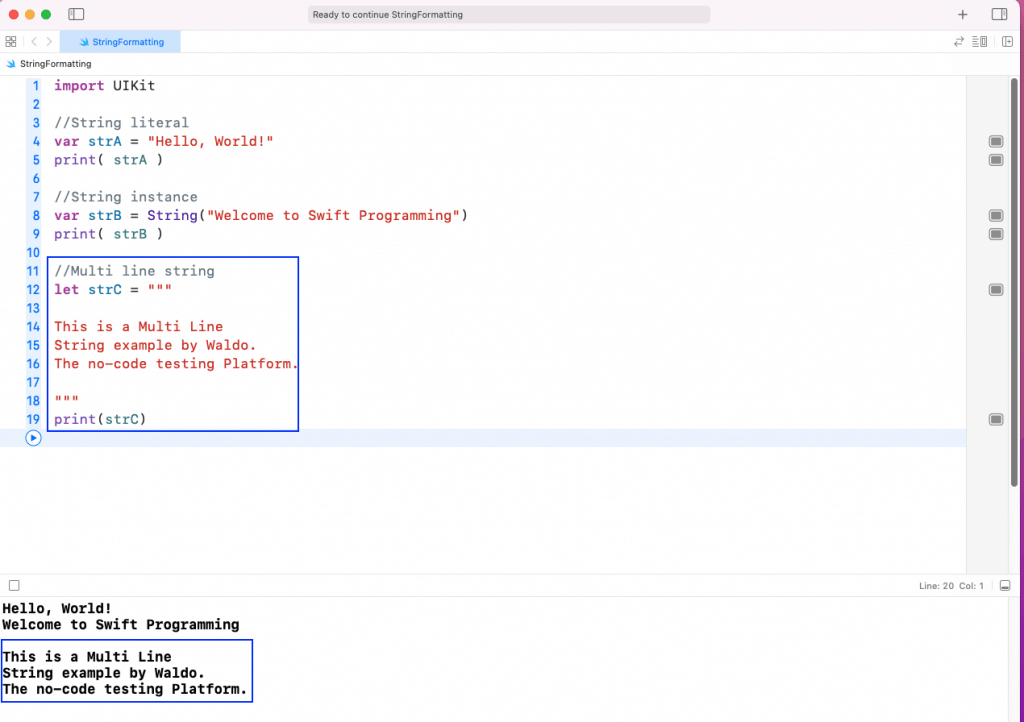
We can also write multiple lines of string using triple quote(“””) to enclose the string. Here, we’ll write the string on multiple lines. And then we’ll add the below code in our playground.
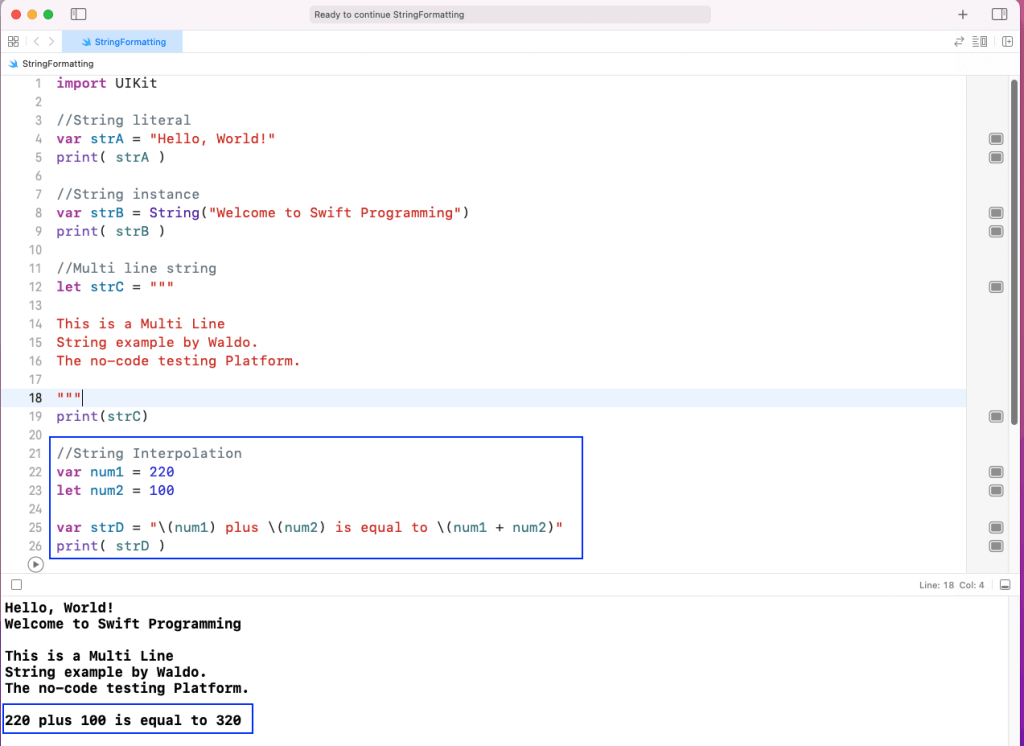
We can interpolate a string and show constants inside a sentence. In the below example, we’ve taken three variables, and we’re showing them in a sentence.
Notice that to show variables in our sentence, we need to use the \() format.
//String Interpolation
var num1 = 220
let num2 = 100

var strD = "\(num1) plus \(num2) is equal to \(num1 + num2)"
print( strD )
As shown in the output below, it will interpolate the variables as numbers. And we’re also doing an addition operation in it.
We have some useful string functions in Swift, which help us to format the string. We’ll look into them in this section.
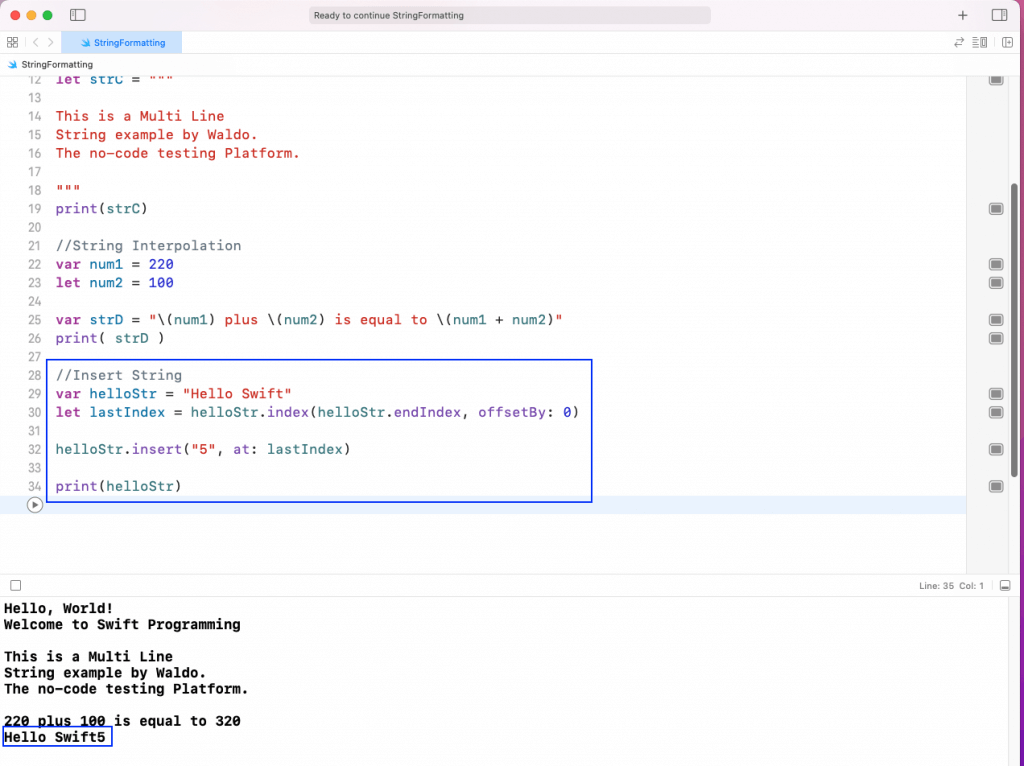
We can insert a character in the string using the insert function.
We can insert a character in the string using the insert function. But to get the desired index to insert, we need to use the index() function first.
As shown in the below example, we’ll get the last index of the string helloStr first. After that, we’ll use the insert() function to insert 5 in the last position.
//Insert String
var helloStr = "Hello Swift"
let lastIndex = helloStr.index(helloStr.endIndex, offsetBy: 0)

helloStr.insert("5", at: lastIndex)

print(helloStr)
As we can see from the output, 5 is inserted last.
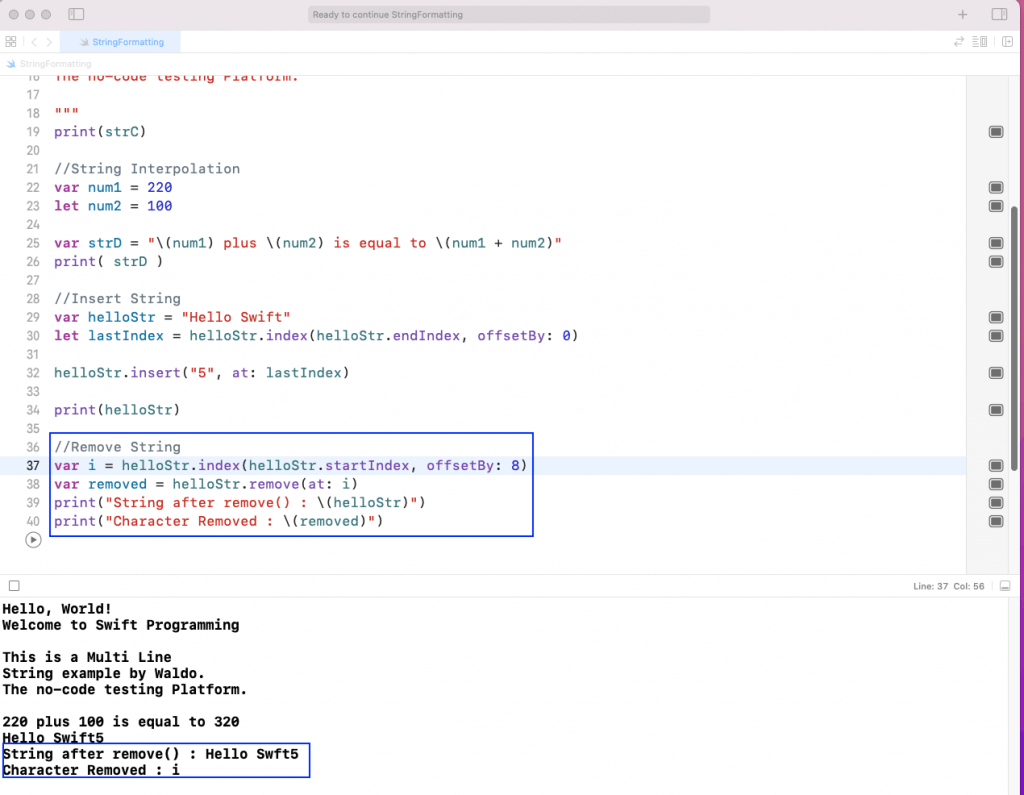
We can remove a character in the string using the remove function. Again, to get the desired index to insert, we need to use the index() function first.
As shown in the below example, we’ll get the first index of the string helloStr first. Then, using offsetBy, we’ll get the index 8. After that, we’ll use the remove() function to remove the element in the eighth position.
We’ll also store the removed character in a variable called removed. After that, we’ll print both the removed character and the string after removal.
//Remove String
var i = helloStr.index(helloStr.startIndex, offsetBy: 8)
var removed = helloStr.remove(at: i)
print("String after remove() : \(helloStr)")
print("Character Removed : \(removed)")
As we can see from the output, character i is removed.
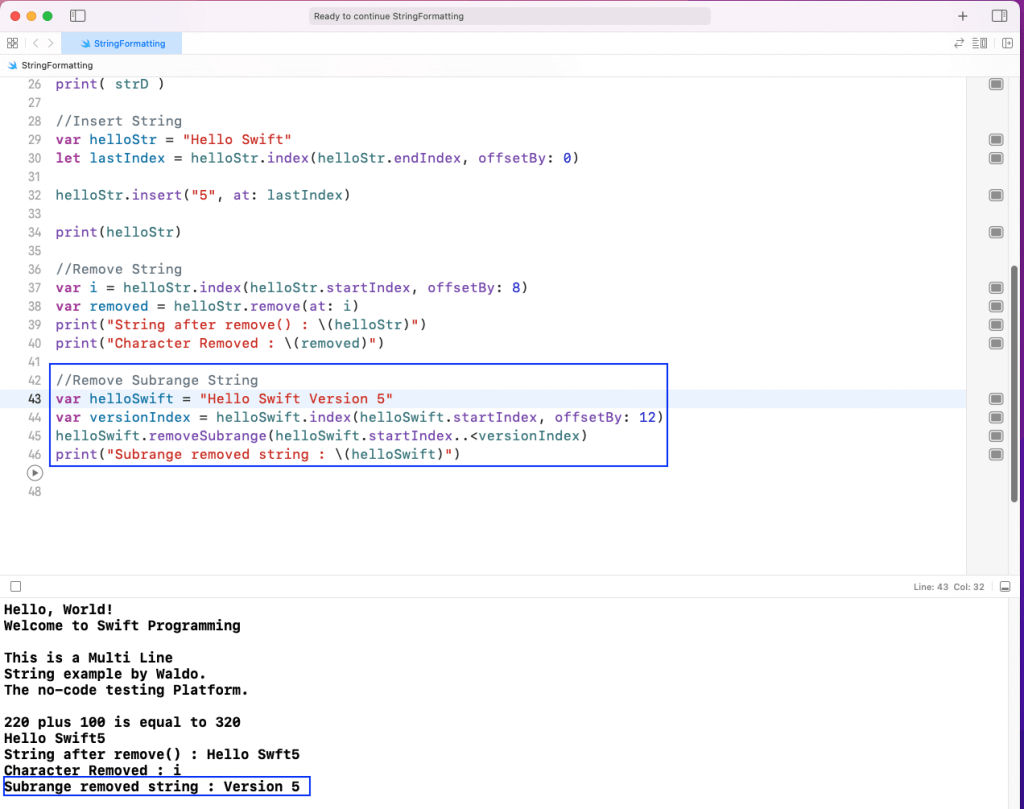
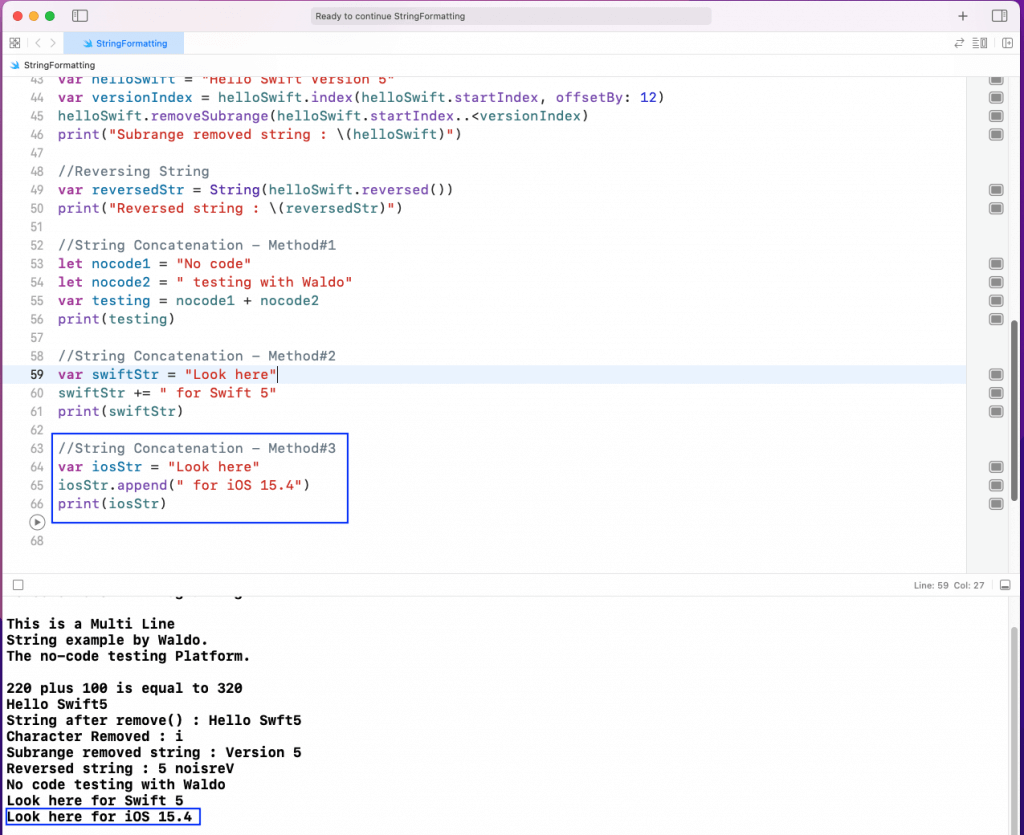
We can remove more than one character in a string using the remove subrange function.
As shown in the below example, we’ll get the first index of the string helloStr first. Then, by using offsetBy, we’ll get the index 12. After that, we’ll use the removeSubrange() function and give a range in it.
//Remove Subrange String
var helloSwift = "Hello Swift Version 5"
var versionIndex = helloSwift.index(helloSwift.startIndex, offsetBy: 12)
helloSwift.removeSubrange(helloSwift.startIndex..<versionIndex)
print("Subrange removed string : \(helloSwift)")
As we can see from the output, Hello Swift was removed.
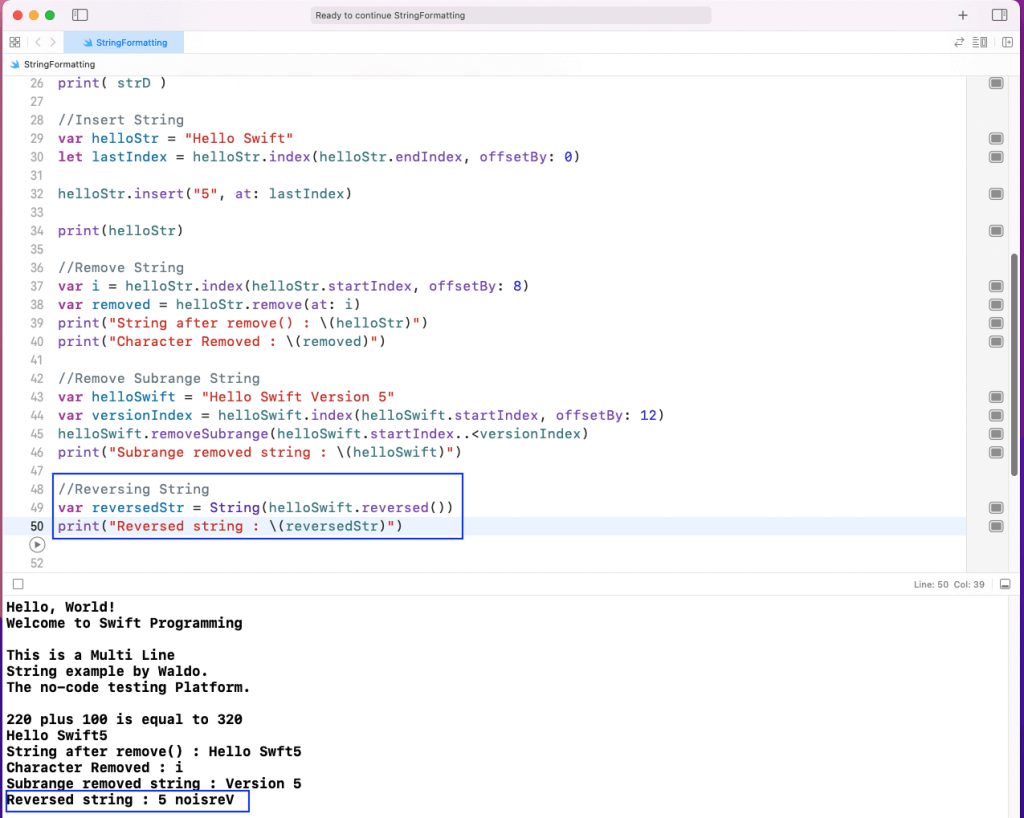
We can reverse a string easily with the reversed function. As shown in the below example, we just need to add reserved() to the string to be reversed.
//Reversing String
var reversedStr = String(helloSwift.reversed())
print("Reversed string : \(reversedStr)")lt;versionIndex)
print("Subrange removed string : \(helloSwift)")
As we can see from the output, Version 5 was reversed. It was reversed to 5 noisreV.
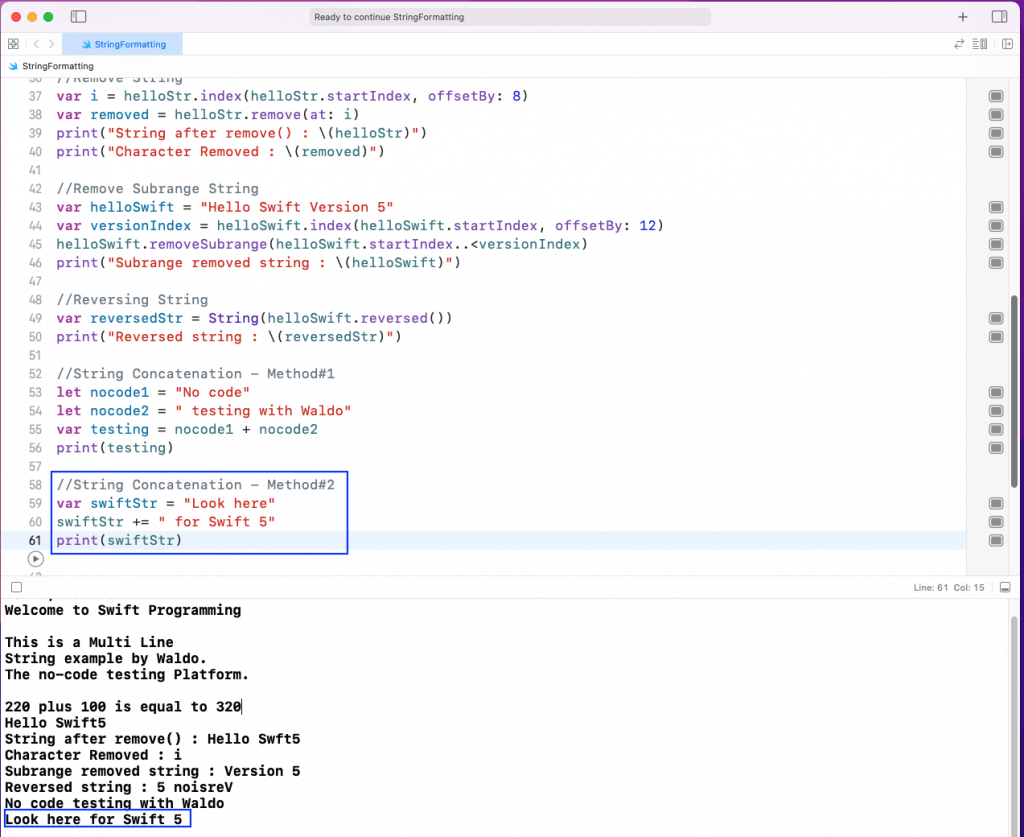
By string concatenation, we mean the way to add two or more strings. There are three ways to do it in Swift.
The most common way to concatenate strings is by using the addition operator (+). When we apply this to two strings, it will combine them.
We can add a new string to an existing string using the += operator. In the below example, we have a swiftStr variable, and we’ll add a new string to it.
//String Concatenation - Method#2
var swiftStr = "Look here"
swiftStr += " for Swift 5"
print(swiftStr)
As shown in the output, the swiftStr string contains the text Look here for Swift 5.
We can add a new string to an existing string using the append method. In the below example, we have an iosStr variable. We’ll add a new string to it.
//String Concatenation - Method#3
var iosStr = "Look here"
iosStr.append(" for iOS 15.4")
print(iosStr)
As shown in the output, the iosStr string contains the text Look here for iOS 15.4.
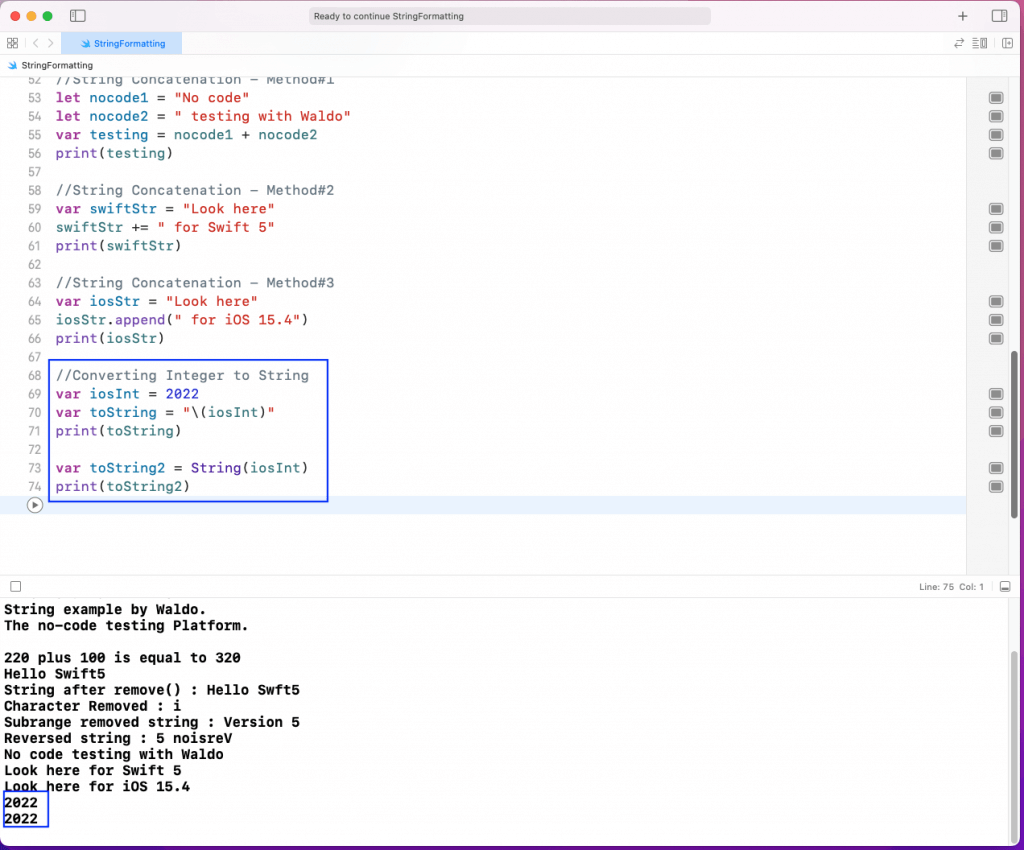
We can convert a string to an integer. And we can also convert an integer to a string. We’ll look into this next.
We can convert an integer to a string in the following two ways. Notice that we can do it by putting it inside double quotes. Or we can do it by the String method.
//Converting Integer to String
var iosInt = 2022
var toString = "\(iosInt)"
print(toString)

var toString2 = String(iosInt)
print(toString2)
As shown in the output, iosInt is converted into a string.
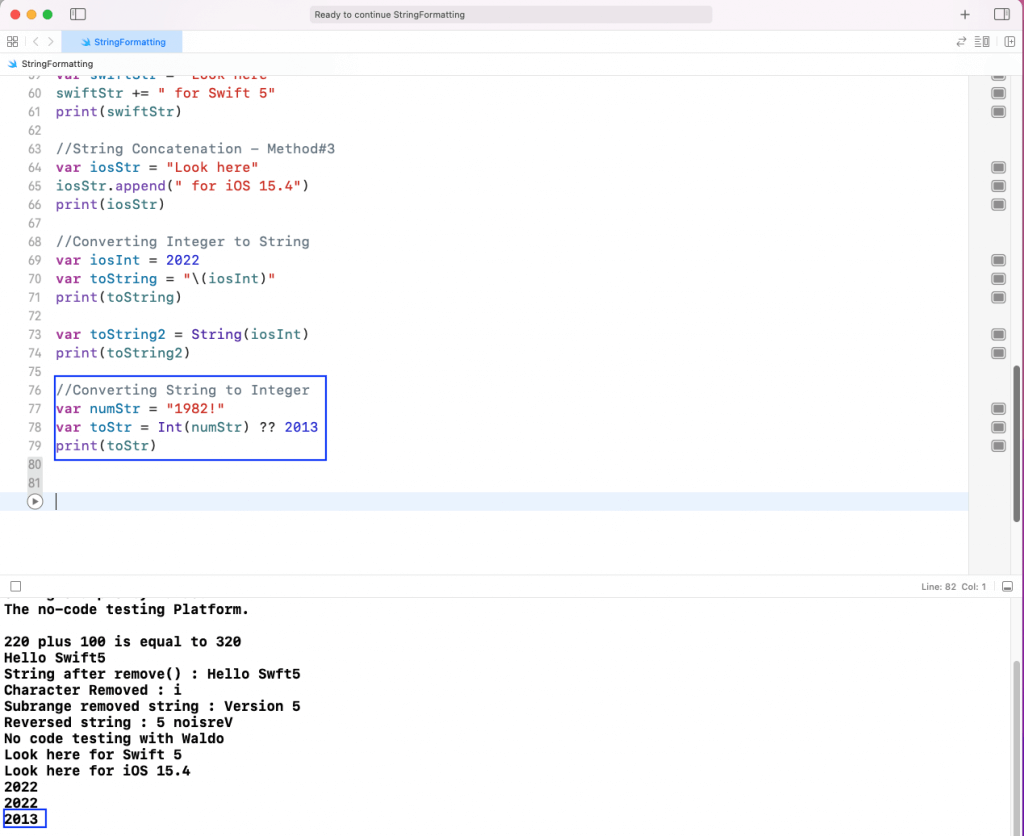
We can convert a string to an integer in the following way.
Notice that a string can also contain characters other than a number.
In the below example, our string is 1982!. So, while converting it, we should always use the optional of ??. And we should give an optional value or else the Swift program could crash.
//Converting String to Integer
var numStr = "1982!"
var toStr = Int(numStr) ?? 2013
print(toStr)
As shown in the output, we get 2013 because Swift was not able to convert 1982! into a number.
We can also change strings to a different format using the String method. It accepts the format parameter in which we can give different types.
In the below example, we’ll give the Leading Zero format first with %03d and %05d. Here, 3 and 5 specify the number of zeros including the digit.
//Formatting Strings - Leading Zeros
let formatNum1: Int = 7
let str1 = String(format: "%03d", formatNum1)
let str2 = String(format: "%05d", formatNum1)
print(str1)
print(str2)
Next, we’ll specify the number of floating points in a floating point number. We’ll use “%.2f” and “%.4f”, which specify the number of floating points after the dot.
//Formatting Strings - Floating numbers
let formatNum2: Float = 7.256897
let str3 = String(format: "%.2f", formatNum2)
let str4 = String(format: "%.4f", formatNum2)
print(str3)
print(str4)
Lastly, we can also change an integer to hexadecimal format. Here, we need to give “%2X” or “%2x”. These specify whether the hexadecimal will be shown in uppercase or lowercase.
//Formating Strings - Hexadecimal numbers
let formatNum3: Int = 45678
let str5 = String(format: "%2X", formatNum3)
let str6 = String(format: "%2x", formatNum3)
print(str5)
print(str6)
We can see in the output the result of all three formattings.

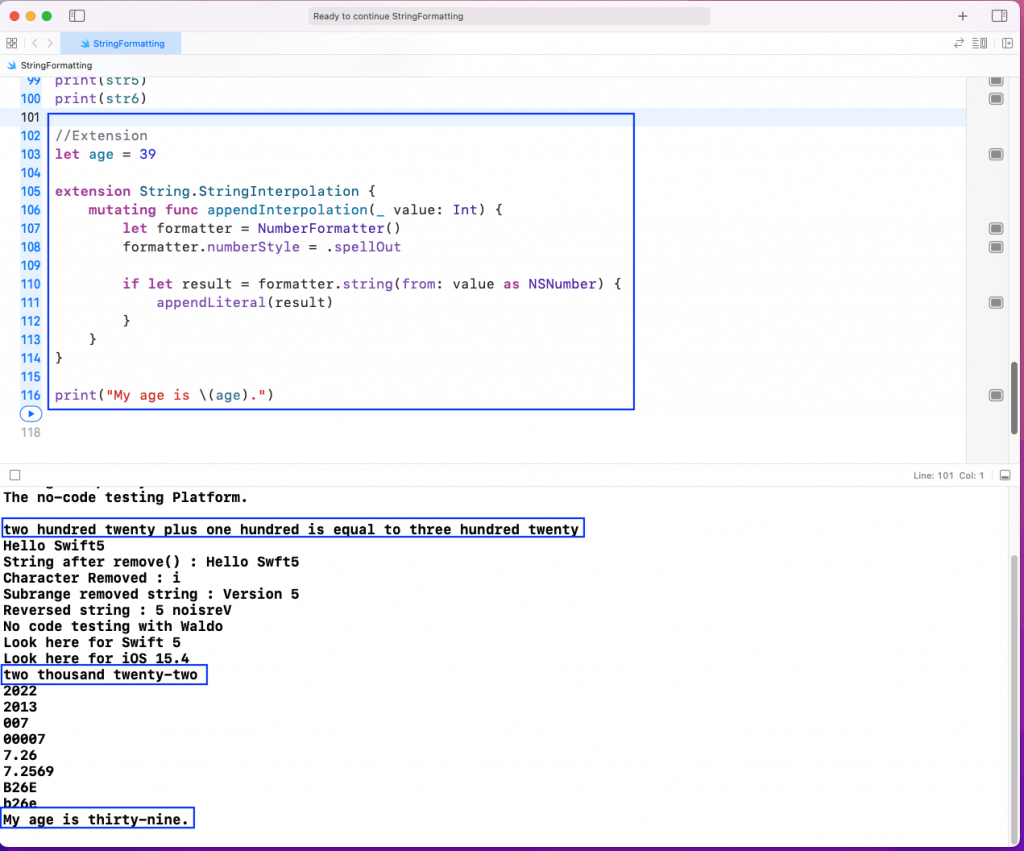
We can also extend the functionality of string in Swift 5 through Extension. Suppose, in our program, we want the integers to be spelled out. For example, 20 should be written as twenty.
In the below example, we’ll use the extension functionality to change the way numbers are interpreted. Using .spellOut is the key here, which changes the number to a string.
//Formating Strings - Hexadecimal numbers
let formatNum3: Int = 45678
let str5 = String(format: "%2X", formatNum3)
let str6 = String(format: "%2x", formatNum3)
print(str5)
print(str6)
On running the code, the 39 will be converted to thirty-nine. But notice that all the other numbers used earlier will also be converted.
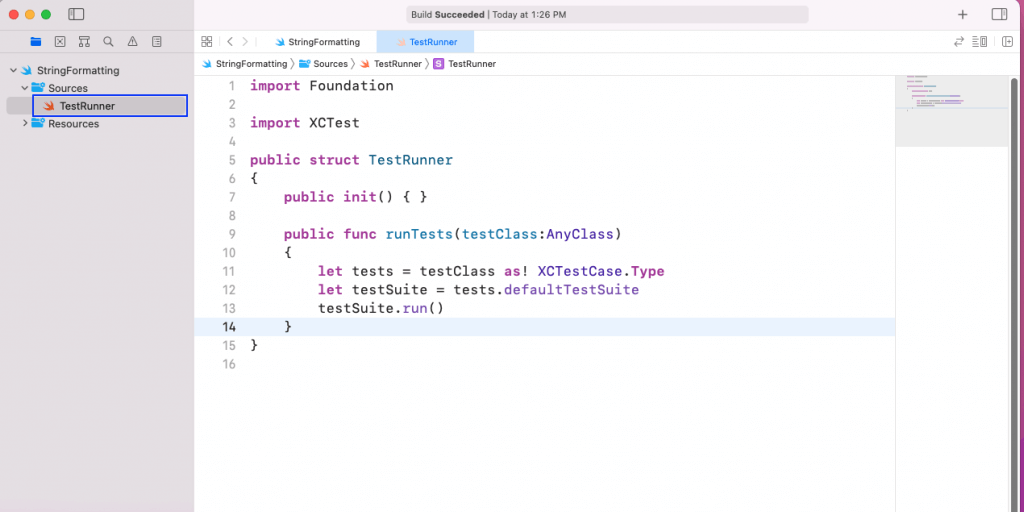
We can test our playground code with the XCTest framework. Since we haven’t created an iOS app, it will require some more boilerplate code.
First, create a file called TestRunner in the Sources folder and add the below code in it. Here, after doing the required imports, we need to write a structure called TestRunner. Inside it, the code specifies that it will run all test suites.
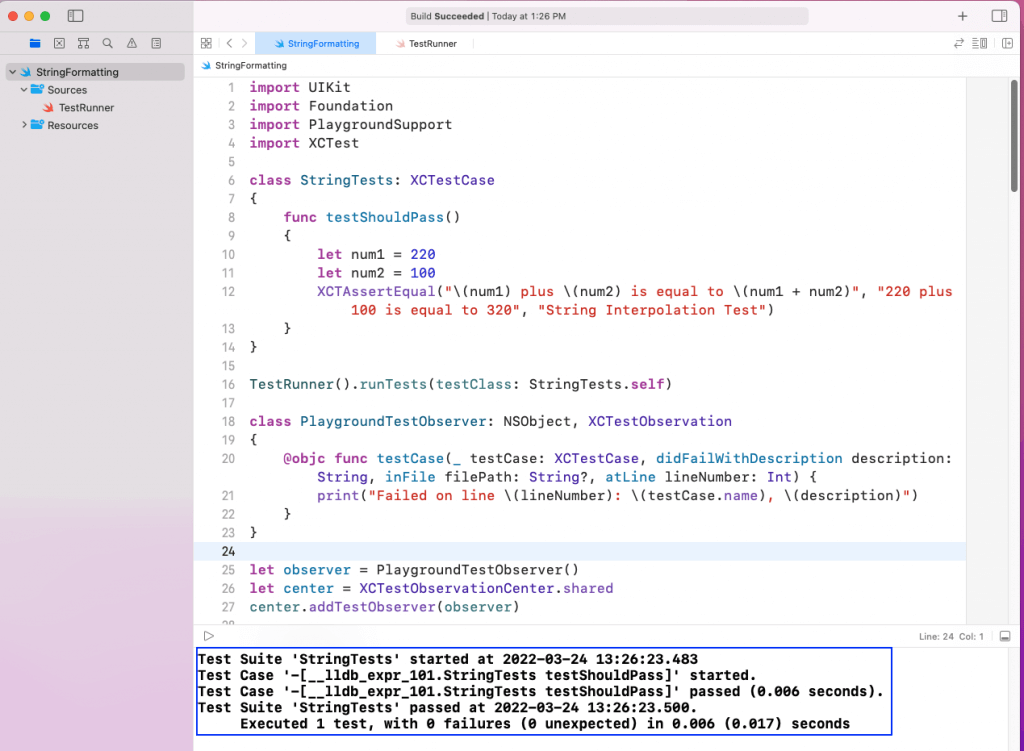
Next, in our playground file called StringFormatting, we’ll do the required imports first. After that, we’ll write the class StringTests. Inside the class, we’ll do an Assert test to check on the string interpolation code.
After that, with TestRunner, we’ll run the runTests() function. Here, we’ll pass our StringTests.
The code for PlaygroundTestObserver is required to run the test cases in the playground. Lastly, when we run the file, it will show the test case to be successful.
While understanding string formatting is essential, ensuring your app performs flawlessly across various scenarios is equally critical. Manual testing can be time-consuming and prone to errors, especially for complex apps. This is where Testim Mobile shines.
Testim Mobile is a no-code testing platform that automates the testing process, enabling you to focus on development rather than manual testing. With Testim Mobile, you can automatically generate test cases, perform user interactions, and receive test results directly in your inbox.
Automated Testing: Reduce the time spent on manual testing by automating repetitive tasks.
No-Code Platform: Easily create and manage test cases without writing a single line of code.
Seamless Integration: Integrate Testim Mobile into your existing CI/CD pipelines for continuous testing.
Our only test case ran successfully. However, adding complex things like extensions of strings would require us to write a very complicated test case. Instead, we can use the no-code testing platform Testim Mobile in place of writing all test cases manually.
Testim Mobile can also perform user iteration like clicking on a button. In Testim Mobile, the test cases will be generated automatically, and the test results sent to our inbox.
In this post, we’ve done the basic setup of a playground in which to write our code. After that, we learned about the basics of strings in Swift. Next, we learned the different string functions. After that, we looked at the different string concatenation methods. We checked out the conversion and string format methods. Lastly, we learned to add functionality to strings using the extension method.
Mastering Swift string formatting is just the beginning. To truly elevate your iOS development, incorporating automated testing with Testim Mobile will ensure that your app is both reliable and user-friendly. Start optimizing your testing process today with Testim Mobile and focus more on delivering exceptional mobile experiences.
The author of the post is Nabendu Biswas . Nabendu has been working in the software industry for the past 15 years, starting as a C++ developer, then moving on to databases. For the past six years he’s been working as a web-developer working in the JavaScript ecosystem, and developing web-apps in ReactJS, NodeJS, GraphQL. He loves to blog about what he learns and what he’s up to.