
Reports & White Papers
Estimate how increasing risk coverage impacts quality and costs
Of course test automation increases risk coverage, which in turn...
Learn how bottom-up testing works, why it’s effective for debugging modules early, and how it fits into a complete integration testing strategy.

According to John Tukey, an American mathematician and statistician, “Testing is a critical part of software development. Without testing, the software is likely to have defects.” However, the approach by which you test your application determines how fast and efficient it’ll be. One of the commonly used methods is bottom-up testing.
Bottom-up testing ensures that the foundational components of an application are validated before the overall system integration. This approach reduces the time spent debugging and ensures that the software is stable from the foundation.
This guide covers the basics of bottom-up testing. You’ll learn about how it works, its use cases, benefits, and best practices.
Bottom-up testing, or bottom-up integration testing, is a software testing approach where testing starts with the lowest-level modules. We test these modules independently, then gradually integrate them with the higher-level modules until we test the entire system.
This approach helps identify bugs at the earliest stages and reduces the complexity of debugging during later integration.
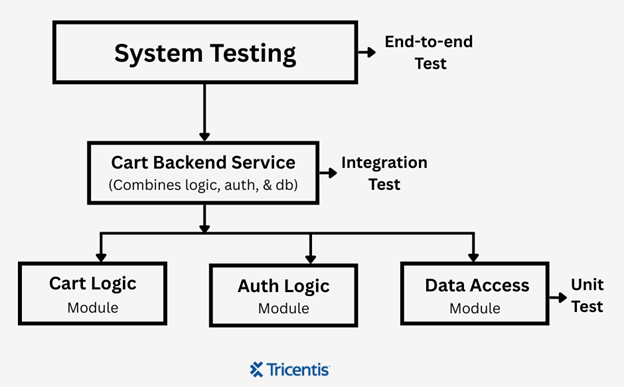
Let’s take an e-commerce platform, for example. Bottom-up testing would start by testing backend modules such as:
Once these are verified, they are integrated into a larger cart backend service, and integration testing is performed to ensure the modules work well together. Finally, the full end-to-end test is executed, validating workflows like user login, item checkout, and order submission.
Bottom-up testing ensures that the foundational components of an application are validated before the overall system integration.
Bottom-up testing relies on several essential components that collaborate to guarantee dependable integration from the outset.
These are the smallest pieces of your application, like classes, functions, or services that perform specific tasks. We test these modules first because they are crucial to everything else in the application.
A driver is a piece of test code that mimics the parent module. Since you’re testing the lower modules before the upper ones, you’ll need drivers to simulate those upper modules.
These are the actual test scripts written to check if each low-level module works as expected. They test specific inputs and outputs, catch bugs, and confirm that everything is working well independently.
This is the outcome of integrating multiple tested modules into a functional part of the system. You also need to test the subsystem to make sure the modules still work correctly when combined.
Once you’re done with the subsystems, you need to write integration tests to ensure that the modules interact correctly. They check data flow, sequence, and behavior between modules.
Bottom-up testing follows a structured approach where the smallest modules are tested first and gradually integrated to form the complete system.
Here’s how it works:
Bottom-up testing begins by writing unit tests for individual, low-level modules. They might include things like:
Each one is tested separately to ensure it works well. You only need to ensure the module works as expected; you aren’t worried about how it interacts with other components.
Because the system isn’t fully built yet, some modules that call the low-level code aren’t available. A driver is now required in order for the high-level modules to operate. Without drivers, you’ll be stuck waiting for the full system to be ready before you can test anything.
Once you have tested and verified the functionality of individual modules, the next step is to integrate them. This is where you start forming subsystems, which are groups of modules that work together to perform a larger function. For example, a cart subsystem might include the following components:
This step moves testing beyond isolated functions and starts validating real-world interactions between modules.
With the subsystem in place, you can now write integration tests that validate it. You’re testing data flow, error handling, and method calls—things that aren’t apparent when testing each module alone.
Once all modules and subsystems are integrated, you can conduct end-to-end testing. These tests help verify that the entire system works well together. Examples include:
Here are some commonly used tools that support bottom-up testing, along with explanations of how they fit into the workflow:
These tools allow you to write automated tests for individual functions or classes, which is the first step in bottom-up testing. They also support assertions, setup/teardown routines, and test organization.
Examples:
In bottom-up testing, mocking tools allow you to simulate the behavior of another module that a low-level component depends on, even if that module hasn’t been implemented yet.
Examples:
These tools automate the execution of test suites (including bottom-up tests) in pipelines. You can configure pipelines to run unit and integration tests after every commit, ensuring early detection of issues as modules are integrated from the bottom up.
Examples:
These tools organize test cases and track test coverage across layers. They help you manage the progression of tests from low-level modules up through system-level components in a structured way.
Examples:
Bottom-up testing has several advantages, especially when you want to ensure a stable system.
Bottom-up testing has several advantages, especially when you want to ensure a stable system. Here are some key benefits:
While bottom-up testing is effective in many scenarios, it also comes with its limitations. Here are some challenges you should consider before adoption:
Write drivers to simulate higher-level modules that you haven’t developed yet. This adds extra development and maintenance effort and can lead to inaccuracies if there are errors in the drivers.
Integrating and testing modules in the bottom-up sequence might omit issues related to the interaction of upper-level logic or workflows until later on. Integration issues may also become more complex as more components are merged.
Testing low-level components in isolation might not adequately show how they work in real scenarios. This makes it harder to ensure the correctness of full system behavior.
You can’t start testing until a significant number of the low-level modules are complete. Any delays or issues in developing these components delay the entire testing schedule.
Here are some best practices you need to follow to ensure the testing process is reliable and aligns with your development goals:
Bottom-up testing demands careful planning and the right tools to be truly effective.
Bottom-up testing demands careful planning and the right tools to be truly effective. While it comes with its set of challenges, a structured approach and adherence to best practices can turn it into a valuable part of the testing strategy.
As with any methodology, its real strength comes from how well you integrate it into the broader development and testing life cycle.
This post was written by Chosen Vincent. Chosen is a web developer and technical writer. He has proficient knowledge in JavaScript, ReactJS, NextJS, React Native, Node.js, and databases. Aside from coding, Vincent loves playing chess and discussing tech-related topics with other developers.

Learn how to supercharge your quality engineering journey with our advanced testing solutions.
Learn how to supercharge your quality engineering journey with our advanced testing solutions.